 I {heart} labels.
I’m sure you are all well aware of that fact now, but I feel it is important to preface a new series with the truth.
Hello, my name is Amy, and I am a label addict.
Whew! Now that the the air is cleared, we can begin.
One of the main ways I keep my home neat, orderly, and in-line is with the use of labels.
As you know, my preferred method is making labels with a label maker, but you can truly use anything to make your home full of label-y goodness.
:: Regular mailing labels (printed on the computer or written on with a Sharpie) This method is a former favorite of mine… before I fell in love with Brother.
:: Copy paper, scissors, and tape
:: Storage bin labels (with the clear “envelope” to stick them in)
:: Tags or pictures *see #8 on Andrea’s list
:: Index cards, Sharpie, and tape
So, you do not have to invest in a label maker to have a label-organized home, but for me… it is definitely has the least amount of work involved. As one of my sweet commenters put it,
“I like the symmetry and neatness, and how they [label-made labels] make everything look intentional.”
Beautifully said, and the whole statement makes my heart go pitter-patter.
Once you figure out what labeling method works for your family, you need to decide what you want to label.
Me? I like to label everything including the kitchen sink, but I’m on the extreme end of things. If you are just starting out with organizing, you need to…
Start Small
Find ONE spot in your home… your pantry, the linen closet, wherever and begin your organization there. If you try to take on more than one area, you will become overwhelmed and frustrated. Believe me!
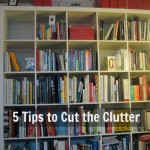
One of my first orders of business was getting my “homeschool” closet organized and ready for the new school year.
It had become a messy “dumping ground” of stuff during the chaos of our summer. Out of sight, out of mind, right?
Between working, kids, and homeschooling, it took two days to get it all cleaned up; but it was definitely worth it!
I love the results, and will share with you in a future post about the actual details of that organizational process.
Speaking of time, you need to be aware of the…
Time Aspect and Commitment
that is involved with organizing.
It takes time, and doesn’t happen overnight.
One of the beauties of the labeling system, is that once you organize and label, you are much less likely to put things where they do not belong. If the bin says, “Crayons and Markers,” you won’t be tossing in Barbie dolls!
You Will Make a Mess
It’s inevitable.
When you are clearing out anything, you have to start fresh. Pull it all out, evaluate what you NEED, what you WANT, and purge the rest. Purging can be recycling, giving away, or trashing it… but get rid of it.
Once you’ve “pulled and purged,” then you need to
Sort and Store
Yes, the old, “sort and store.” You have to find a new home, or change up the old home for every item you keep.
Disclaimer: This stage could possibly lead to more purging.
When you are ready to put things back,
Bring out the Labels!
My favorite part. I love whipping out the label maker and getting busy!
The little noise it makes as it prints out my pretty, perfect label is music to my ears and brings joy to my organizing heart. {It may or may not sound like a buzzing noise that may or may not annoy your husband.}
A few key things to remember when labeling:
:: Have a bin, box, or basket to label. Make sure you have the containers you need to store your items!
:: Organize the items within the bin before you print your label. You don’t want to make a bunch of labels and then have items not fit!
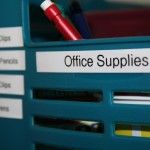
:: Be specific. I like having a “Master” label, and then adding “Sub-labels,” as shown in the picture below.

Label specifically with a "master" label and several "sub" labels
:: Organize items by similarity in function or type. For example: Office Supplies could contain staples, paper clips, pens, etc.
:: Store everything in an easily-accessible area. Make sure you can get to the items you need!
:: Step back and enjoy the beauty… and remember how hard you worked to organize everything. Tell family members of the new system, and that this is where these items are found, and where they are to be put away.
:: Don’t go back to any old habits of just throwing things wherever (a hard one to break, I know). Make the effort to put everything back in its place so you can reap the benefits of your hard work!
As we go through this series, I will show you how I have An Organized Home, and my methods of organization in the kitchen, pantry, laundry room, and more!
Oh, I love this post…I’m a huge fan of labels as well! They make everything look so professional, neat, and organized!
I’m glad you mentioned “start small”…it’s so easy to get overwhelmed; but tackling one small project after another will give you huge results!
Thanks for the great information!
Andrea @ Simple Organized Living´s last blog post ..30th Anniversary Gift
I love labels, but I’m “scared” to use them. What if I change my mind and what to use that bin for something else? It’s my OCD coming out…hahaha. 🙂
Amy´s last blog post ..Rite Aid
You know, I won a gift card to Amazon and I actually BOUGHT a P-Touch! Then yesterday as I was waiting patiently for it to come in, AMAZON CANCELED THE ORDER. Now I’m all bummed out because it was a great deal and on sale. I’m going to try your method instead and just save some money! That way I can pick the font and color – and remove them easier. I have also seen a really pretty Popsicle stick method with personal handwriting and old scrabble letters glued on a bookcase. I love labeling, though – no matter how you do it. Even if it is a little messy – labeling saves SO much time and energy.